
Below you will see all of the cooking equipment we use to make the recipes on this website. We tried many different brands over the years and those are, currently, our top choices.
Note: We don't have any affiliations with, or profit from, any of the brands we mention here.
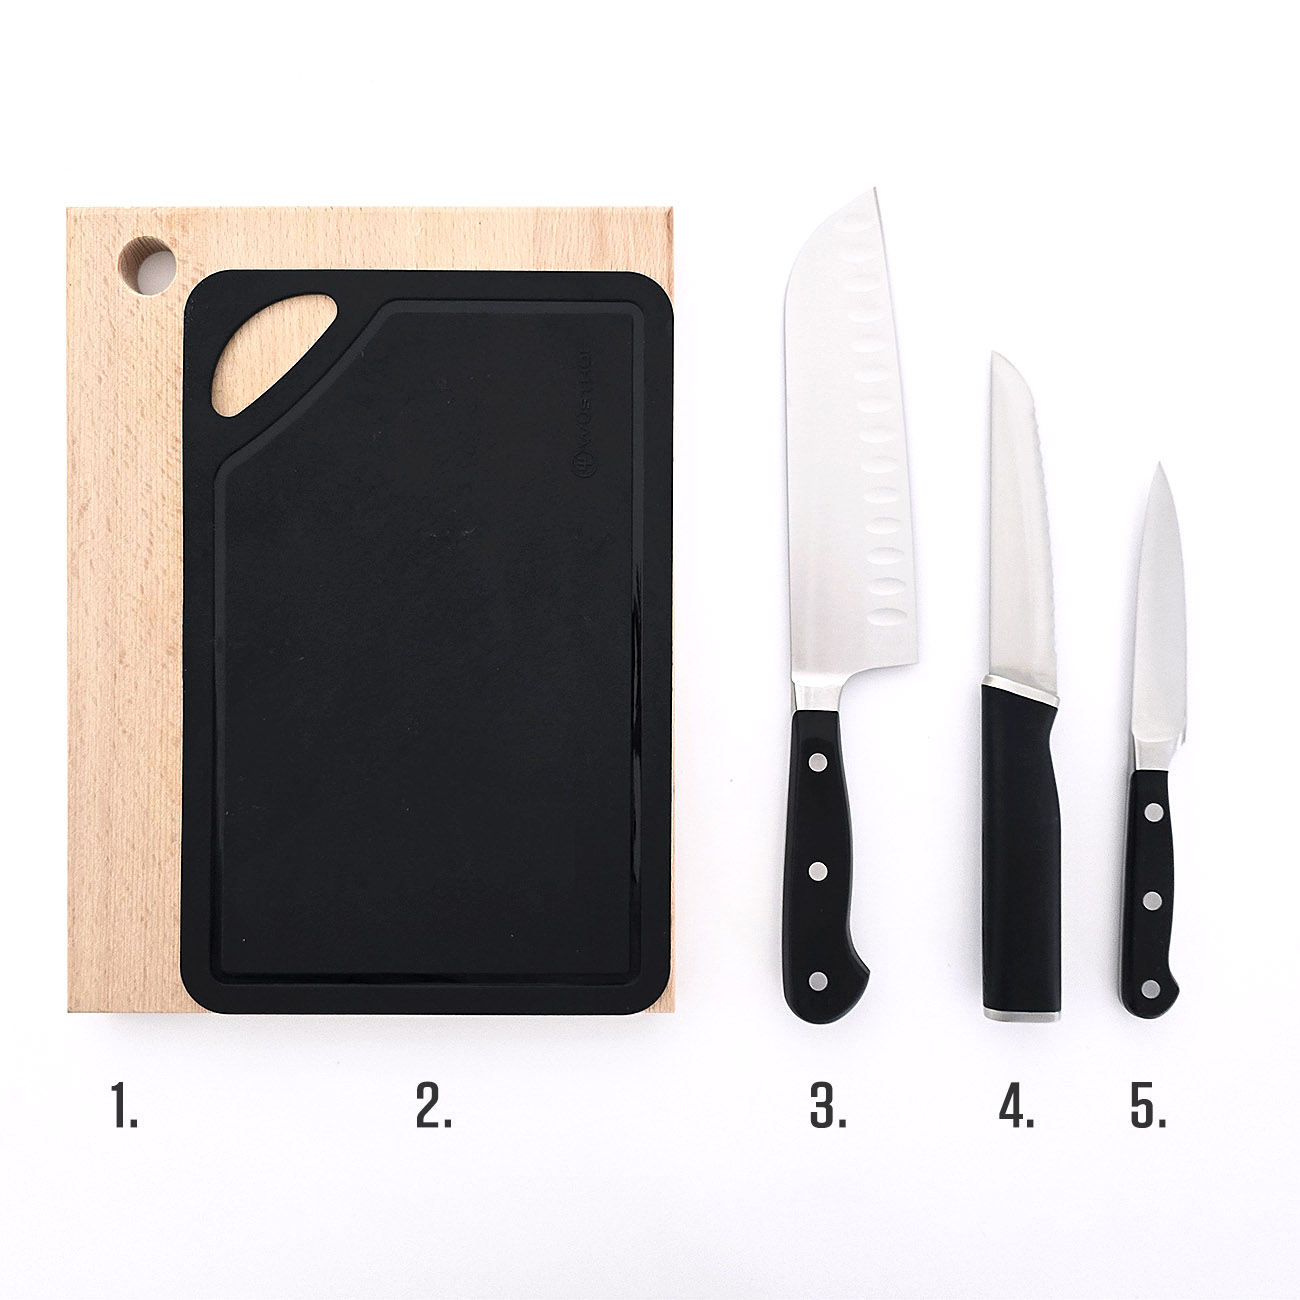
Chopping & Cutting
We have 2 cutting boards. One is made from wood and the other one is made from silicone. We use the silicone cutting board for things that can stain or pass on the odor, like garlic and turmeric. It can be then put in the dishwasher. The wooden chopping board is for cutting fruit, vegetables and cooked food. Wooden cutting boards are safer (there will be no plastic in your food) and they keep your knives sharper for longer. They do absorb odors so make sure you designate one side for vegetables and the other for fruit (or get a second wooden chopping board). If you have access to sunlight in your kitchen, rinse the wooden board after every use and leave in the sun until it is completely dry. The UV rays will disinfect it.
We use 3 types of knives: a chef knife for cutting fruit and vegetables, a utility knife for everything else, a carving knife for small jobs like peeling and dicing garlic, fresh ginger and nuts etc.
- Wooden Chopping Board
- Silicone Chopping Board
- Chef Knife, 17 cm ~ 7 inch
- Utility Knife, 12 cm ~ 5 inch
- Carving Knife, 10 cm ~ 4 inch
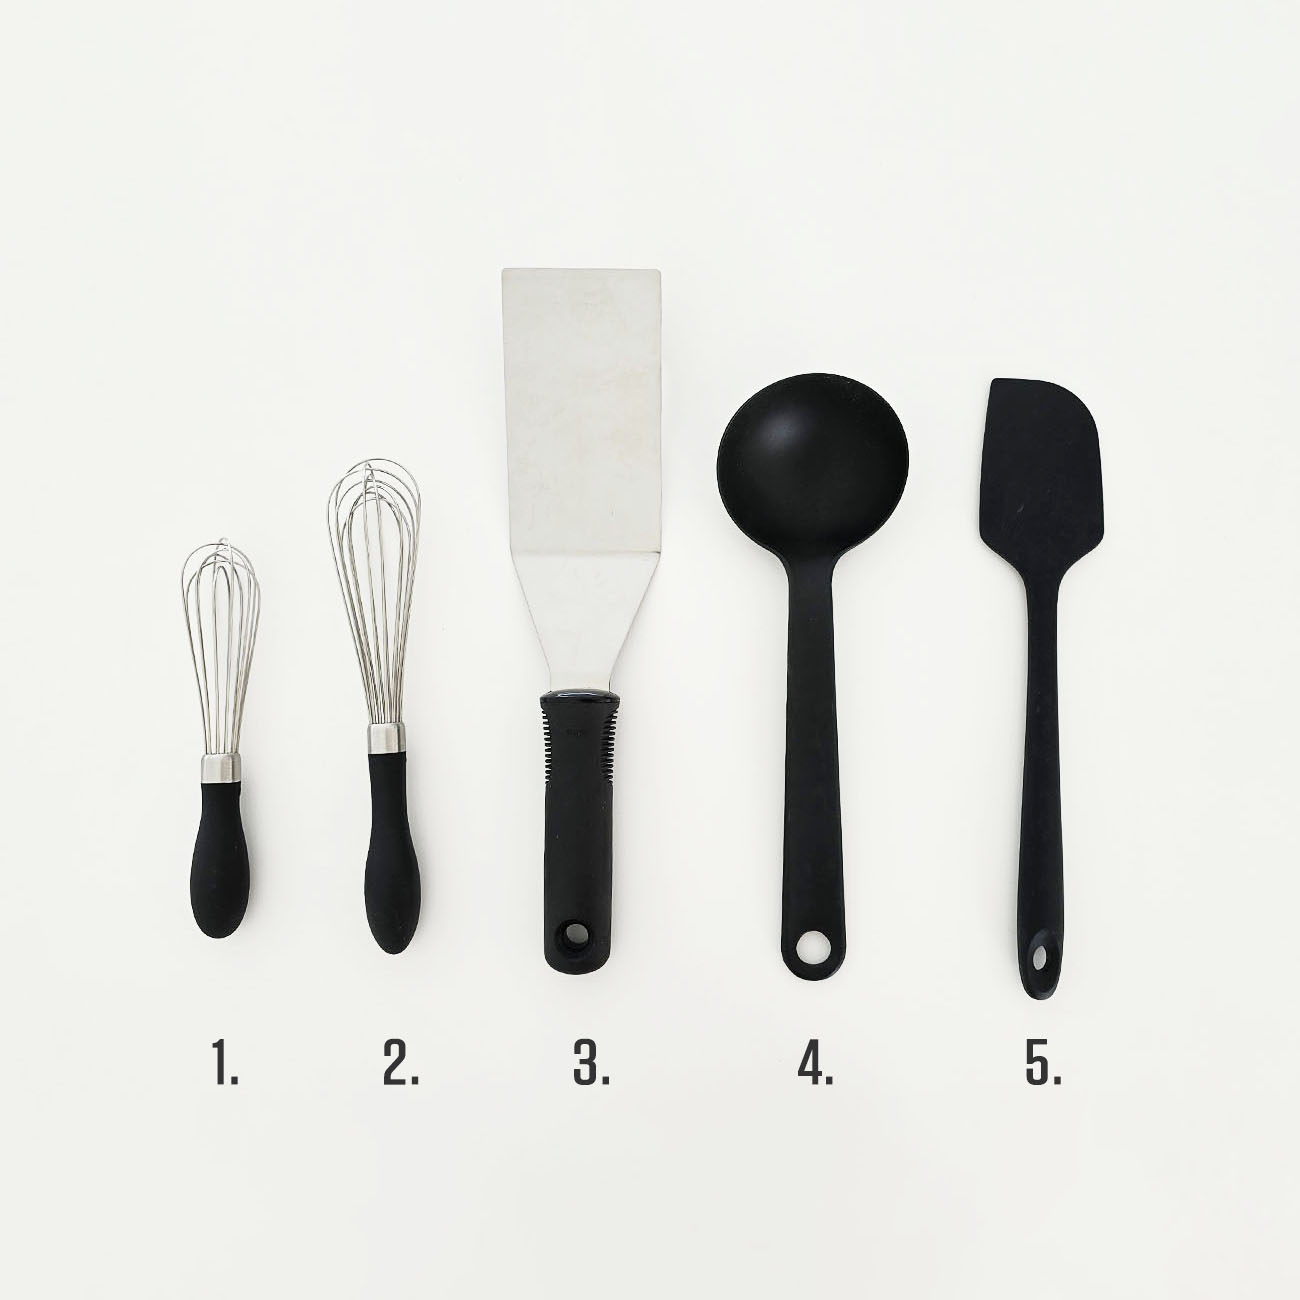
Mixing & Turning
We use two types of whisks: a medium whisk for large quantities of food and a small one for when we are working with small saucepans. We use a stainless steel spatula and tweezers for when we need extra edge to scrape or flip things over. We use a silicone spatula for mixing and tossing. The extra slim spatula is for smaller jobs. We use a black nylon ladle for pouring soups - it’s just easier to keep clean.
- Mini Whisk
18 cm ~ 7 inch | Oxo Good Grips - Regular Whisk
29 cm ~ 11 inch | Oxo Good Grips - Stainless Steel Spatula
32 cm ~ 13 inch | Oxo Good Grips - Stainless Steel Tweezers
28 cm ~ 11 inch - Nylon Ladle
28 cm ~11 inch | EvaTrio - Silicone Spatula
29 cm ~ 11 inch | U-Taste - Slim Silicone Spatula
29 cm ~ 11 inch
Other Utensils
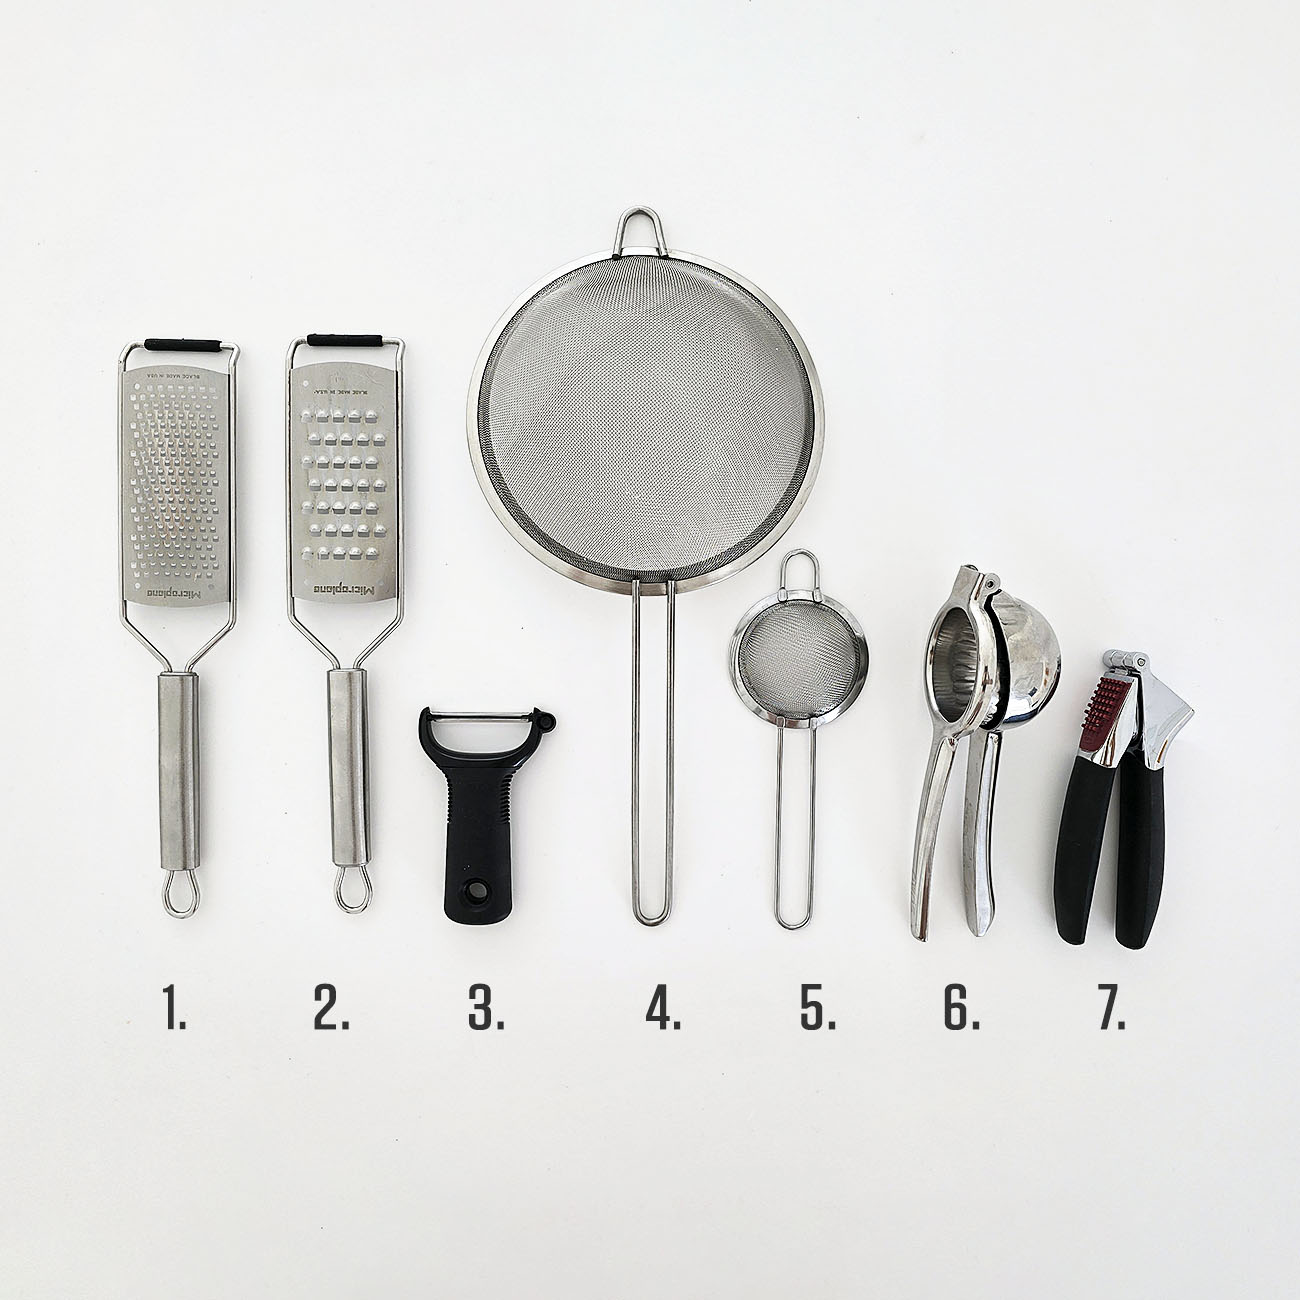
We use two types of graters: a large one and a small one. They are flat so they are easy to clean and store. We use a Y-shaped peeler for peeling everything - you only need one. And of course, we have a classic garlic press. We tried many different types of garlic grinders and choppers but in the end, the classic one is the best. It does the job and it’s the easiest one to clean afterwards. Anything else is more trouble than it’s worth.
We have two types of sieves: a large one and a tiny one. We use the large one to rinse rice, quinoa, lentils etc. We use the tiny sieve for smaller jobs. When we need to squeeze just a tablespoon of juice out of a lemon and we don’t want any seeds falling into the food, it’s our go to. When we need large quantities of lemon or orange juice, we use a manual juice press you see below.
- Very Coarse Grater | Microplane
- Coarse Grater | Microplane
- Y-Peeler | OXO Good Grips
- Large Sieve
- Mini Sieve
- Juice Press
- Garlic Press | OXO Good Grips
Note: Since we only own two graters from Microplane, we refer to the coarse grater as fine grater and very coarse grater as simply coarse grater in the recipe steps.
Oil Spray & Mills
Another invaluable piece of equipment is a refillable oil spray bottle. It doesn’t just better control the oil quantity that you use but it also evenly distributes it when you roast vegetables. You don’t need to drown your food in oil for it to taste great, it just needs to be better distributed. Make sure you buy one with a glass container, not plastic.
A freshly ground pepper is completely different from the pepper that you buy already ground. It adds aroma and a greater visual appeal. How food smells and looks is just as important for our digestion as how it tastes. So we highly recommend that you invest in a pepper mill. Save your wrists, though, and get an electric one that uses AA batteries, see below.
We also have two manual spice grinders from Microplane. It can be used for grinding peppers, cinnamon and nutmeg. We use ours for nutmeg and cinnamon. It's an optional piece of equipment and it is on the pricey side. We love it because it makes it quick and easy to grind nutmeg and cinnamon for garnish. Unlike a fine grater it grinds the entire thing and there is no need for cleanup. If you bake a lot using nutmeg, it's a very handy tool to have.
- Oil Spray
- Pepper Mill
- Spice Mills x 2 | Microplane

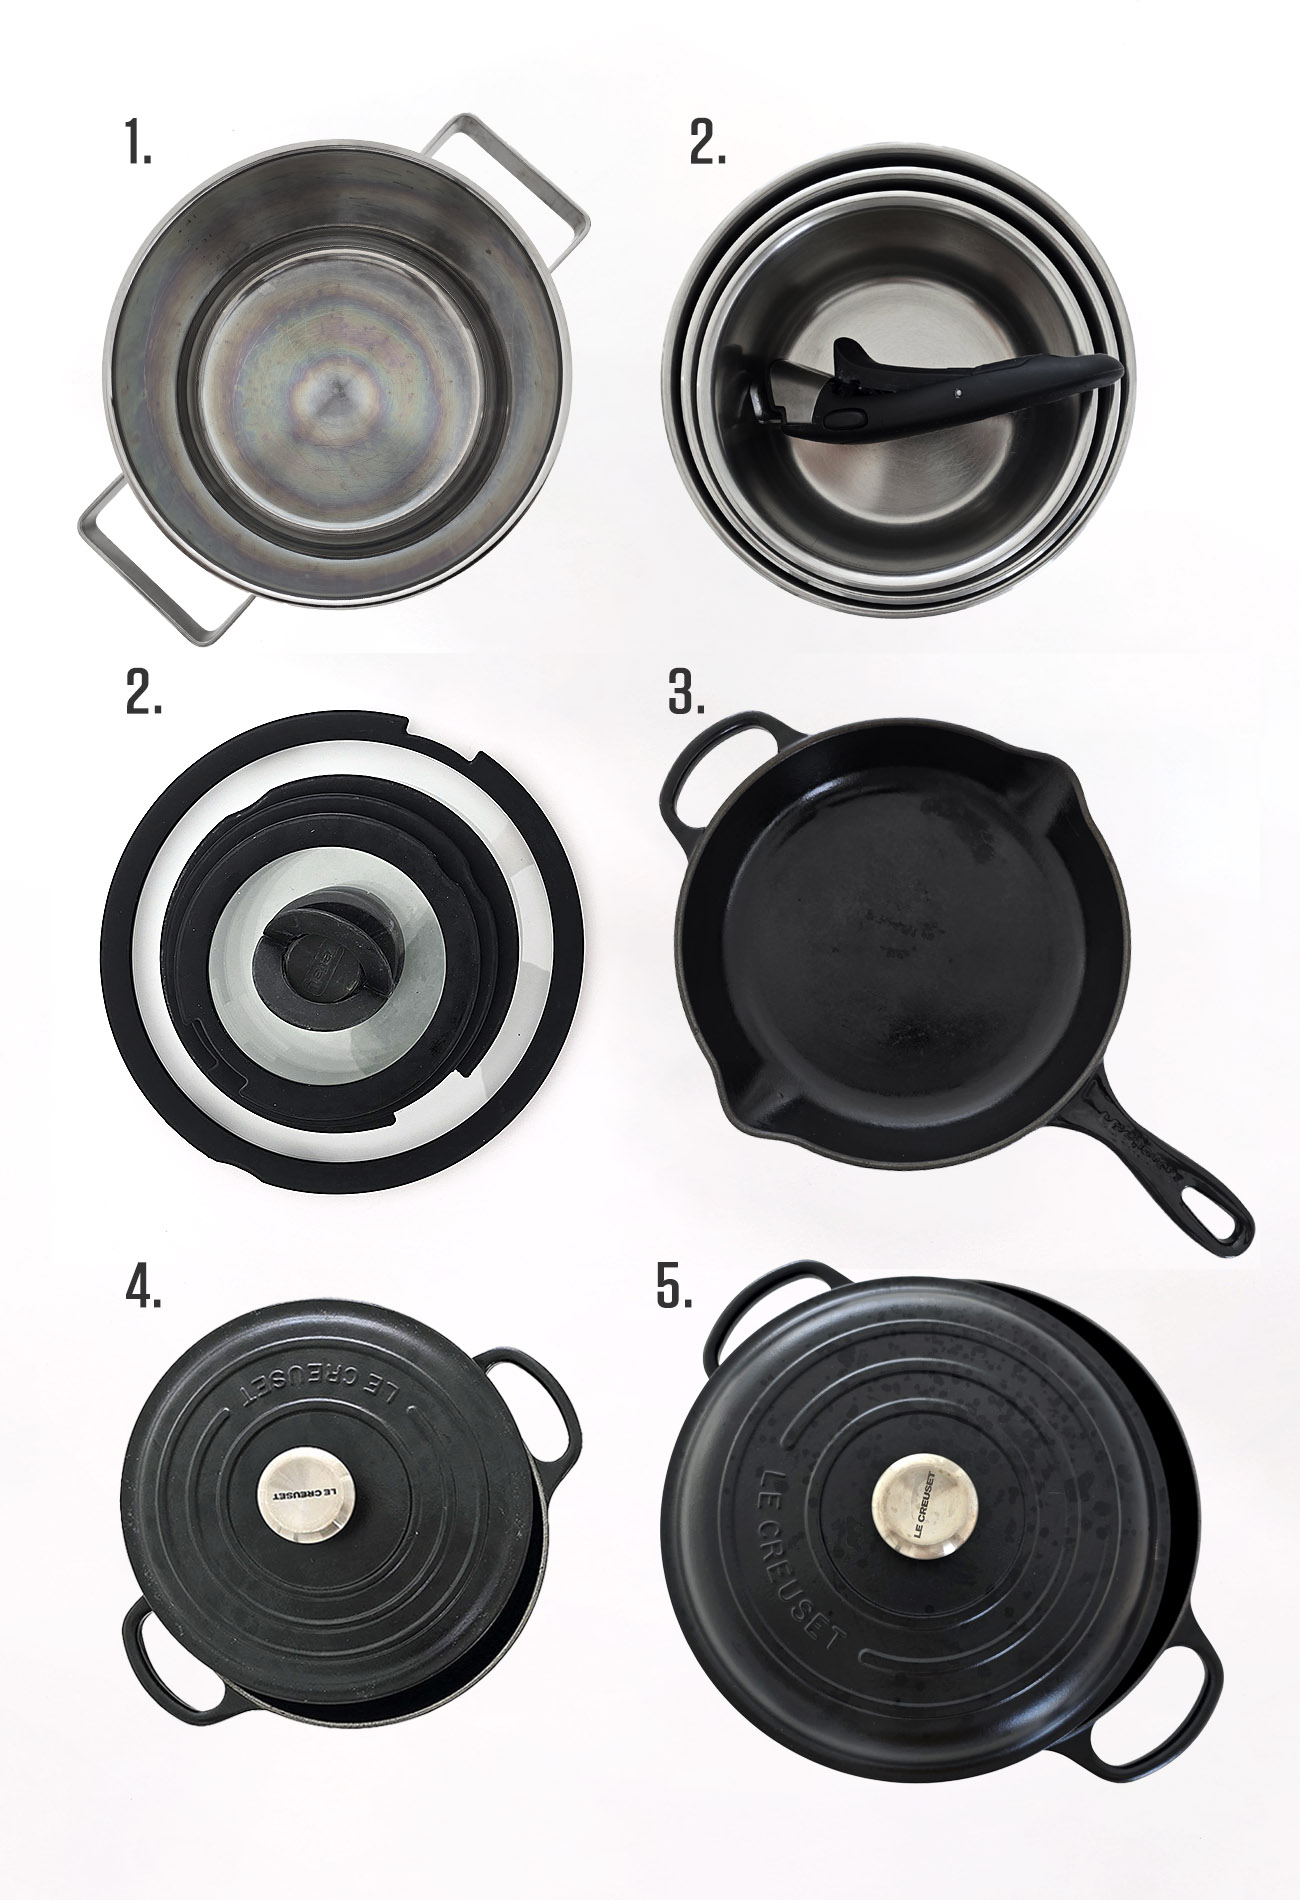
Pots & Pans
Three saucepans we have are nested to save space. They have a detachable handle. We use these saucepans as mixing bowls as well. They are extremely handy when you mix something and then you need to heat it up. The deep 4L pot we use primarily for soups and boiling pasta. We use a cast iron frying pan for frying and sauteing food. Any regular frying pan will do, whether you prefer stainless steel or non-stick. Ours also doubles as a casserole dish for smaller meals. We use a large cast iron casserole dish for larger dishes and a cast iron pot for cooking rice, quinoa and oats. It's very versatile.
1. deep cooking pot, 4L20 cm ~ 8 inch | Eva Solo
2. nested pots:
a) large saucepan
22 cm ~ 9 inch | Tefal Inginio
b) medium saucepan
20 cm ~ 8 inch | Tefal Inginio
c) small saucepan
18 cm ~ 7 inch | Tefal Inginio
3. lids (4)
to fit all of the pots and pans
Tefal Inginio
4. cast iron frying pan
26 cm ~ 10 inch | Le Creuset
5. cast iron cooking pot
20 cm ~ 8 inch | Le Creuset
6. cast iron shallow casserole
30 cm ~ 12 inch | Le Creuset
Cooking & Baking Tools
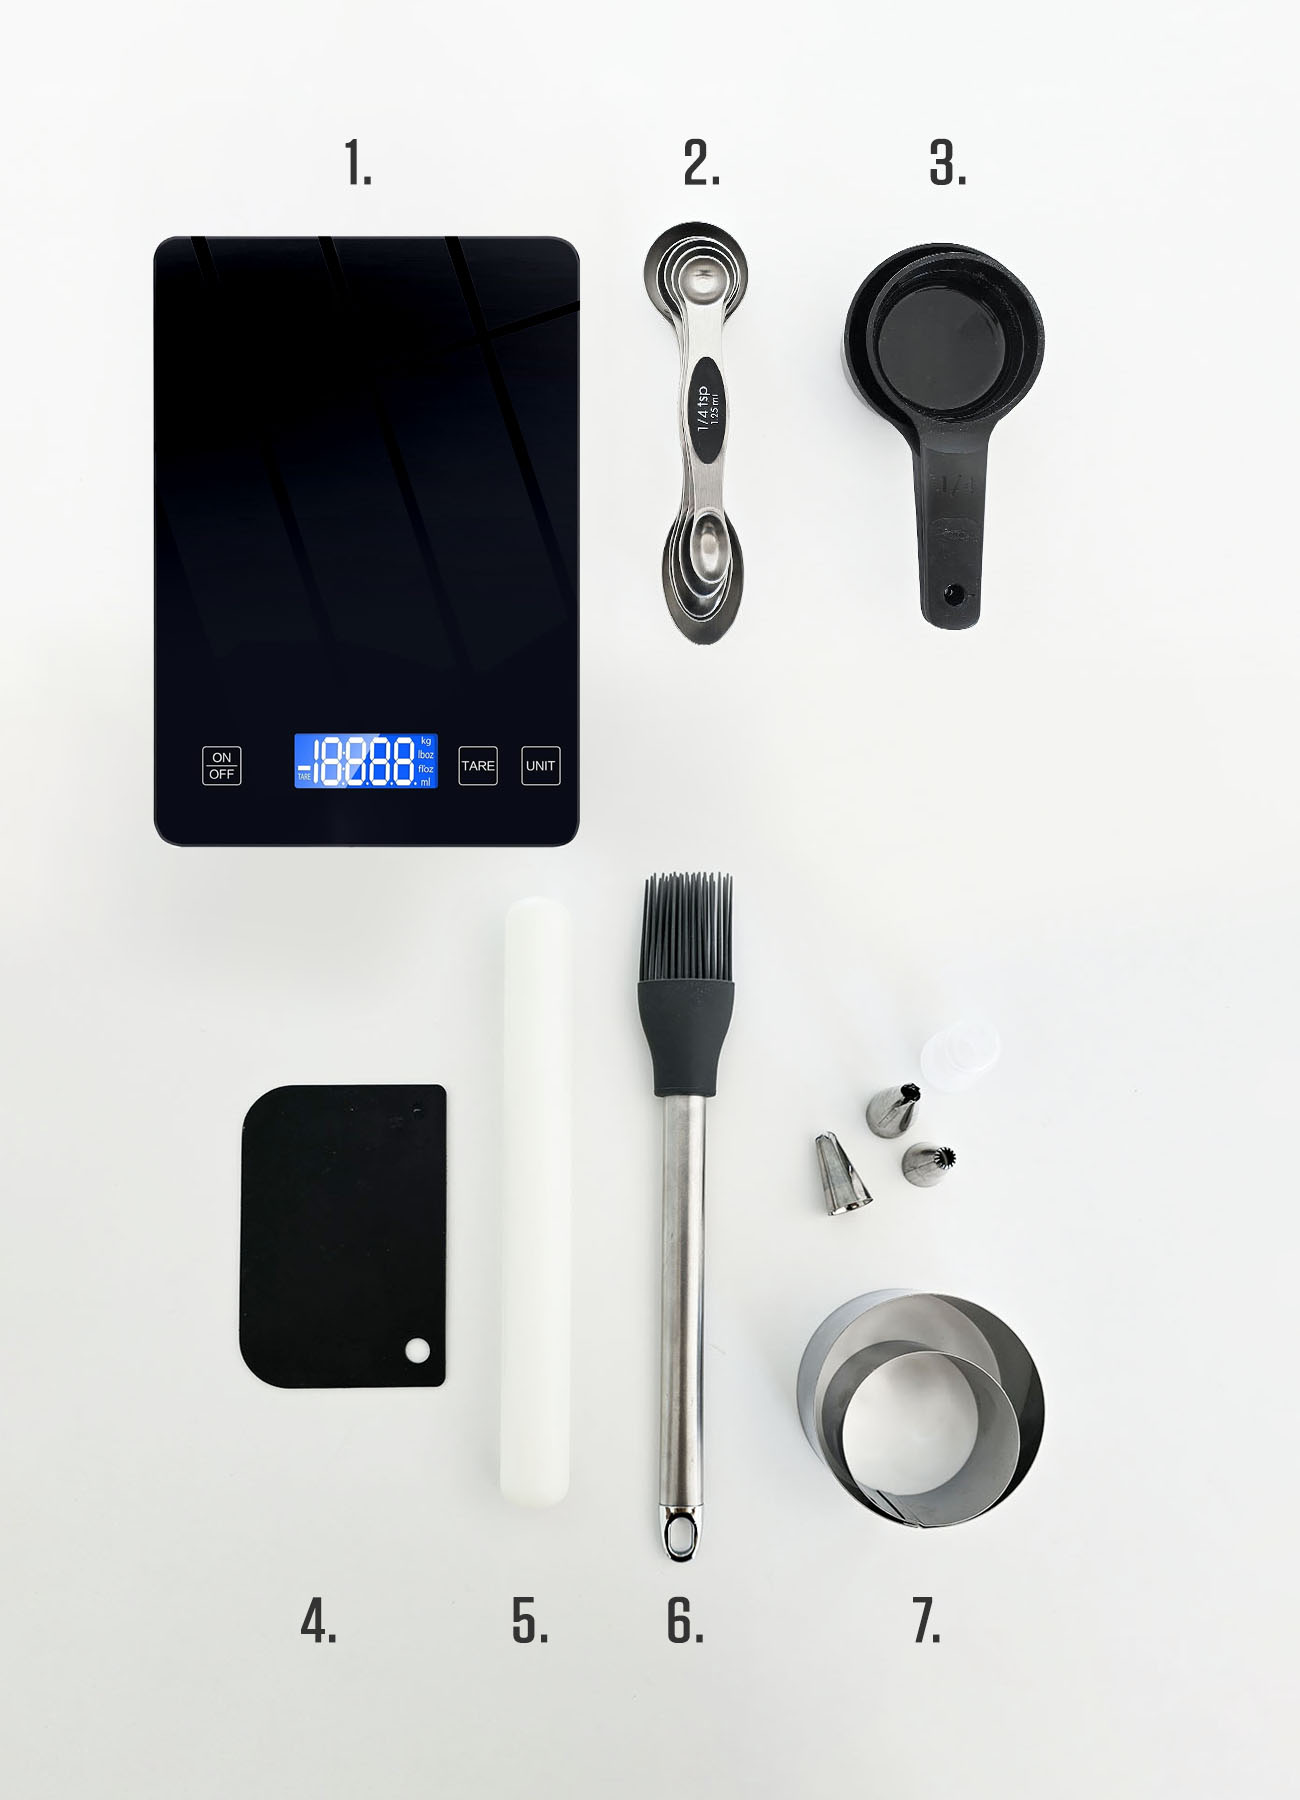
We use two types of measuring equipment: kitchen scales for precision and cups and spoons for when precision is not a requirement. Always buy scales with USB charger or AAA batteries. Button cell or coin batteries are a nightmare to replace and the scales tend to run out of charge in the most inopportune moments. Kitchen scales are a must in any kitchen especially if you do a lot of baking.
We use black plastic measuring cups because they are easy to keep clean. The measuring spoons we have are stainless steel and are magnetic so they are easy to keep all together and store. They have clear labels and are double sided for those small spice jars.
We use a small plastic rolling pin for all our rolling needs - we found that it’s enough for the quantities we are working with and it’s much easier to clean and store. If you are working with yeast type dough on a regular basis, a plastic dough scraper can help a lot during the kneading process. And a small silicone brush is a must for burger buns and cookies that need glaze. These are small but are often invaluable tools to have. We also have a selection of cookie cutters and piping nozzles for when we are being fancy.
- Digital Scales
- Measuring Spoons, magnetic
- Measuring Cups, plastic
- Dough Scraper
- Rolling Pin | Kaiser
- Pastry Brush, silicone
- Cookie Cutters & Piping Nozzles
Baking Tins & Molds
We tried to pick the most popular bakeware sizes for our baking forms and tins that you are most likely to already own. We also kept in mind food portions sizes since we often cook with smaller quantities enough for 2-4 people. We use a smaller tin for cakes since cakes are harder to keep fresh and making smaller cakes is generally a wiser move.
Loaf Form. We use it for making brownies and various bars as well as for baking bread.
Cupcake Trays. We have two types of cupcake trays. One is made from silicone and we use it for no-bake recipes. And the other one is made from carbon steel and we use it for baking. We use the cupcake tray to make muffins. This way we can have smaller portions and bake in half the time.
Tart Molds. We have one large tart mold (20 cm ~ 8 inch) and 4 mini molds (12 cm ~ 5 inch). You can use either when following our recipes. The recipes' quantities will be enough to line and fill either one large tart or 4 mini-tarts. Tip: If you are making tarts often enough, we recommend getting tart tins with a removable bottoms. You can just lift the tart out after baking and it’ll look perfect.
Cake Forms. We also have one cake spring form and two mini-cake spring forms that can be used interchangeably as well. You can make one cake using the larger form or you can make two mini cakes and freeze the second one for later, for example. You can also only make one mini cake (it'll make 2 portions) if you use half the recipe's amounts.
- Baking Loaf Form, 21 x 11 cm ~ 8 x 4 inch | Master Class
- Silicone Cupcake Tray, 6 portions, 24 x 16 cm ~ 9 x 6 inch | Selecto Bake
- Carbon Steel Cupcake Tray, 6 portions, 27 x 18 cm ~ 10 x 7 inch | Master Class
- Tart Form with removable bottom, 20 cm ~ 8 inch | Master Class
- Mini Tart Forms with removable bottom, 4 pieces, 12 cm ~ 5 inch
- Cake Spring Form, 15 cm ~ 6 inch | Master Class
- Mini Cake Spring Forms, 12 cm ~ 5 inch | Master Class

Blenders & Mixers
We use a small extraction blender for almost all our blending needs. It’s small enough to store, it’s powerful and it’s much easier to clean than a standard full size blender. We use two blender cups on a regular basis: 400 ml (~ 14 oz ) and 800 ml (~ 26 oz ).
The small cup came with the blender, the large one we ordered separately (it doesn’t come with the blender but it is made for it). It’s the best type of blender for sauces. The best brands for this type of blender are NutriBullet and Ninja. We own a Ninja (see below).
Tip: You can get a cord bundler for it online like we did (see below).

In addition to a blender, we also have a mini food processor, an immersion blender and a hand mixer 3-in-1 tool. You can get all three individually as well.
1. Hand Mixer. If you are whipping cream, you need a hand mixer. You will usually need it 3-4 times a year when you are making a cake but when you need one, you REALLY need one.
2. Immersion Blender. When you are working with hot liquids, an immersion blender is also a handy tool to have. You never put hot soup in a blender! It’ll blow up or crack your blender whereas an immersion blender is safe. It also gives you a lot of control over how much something is blended. It’s perfect for soups and vegetable mashes. It’s also small enough to store in a small kitchen and it’s easier to clean than a full-size blender.
3. Mini-Food Processor / Chopper. When we need food to still have texture, we use a mini food processor (aka mini chopper). They are extremely popular and are quite affordable to get. A mini food processor chops and grinds but if you need to blend something until smooth, see the blender above. It’s good to have both for different dishes.

Other Optional Equipment
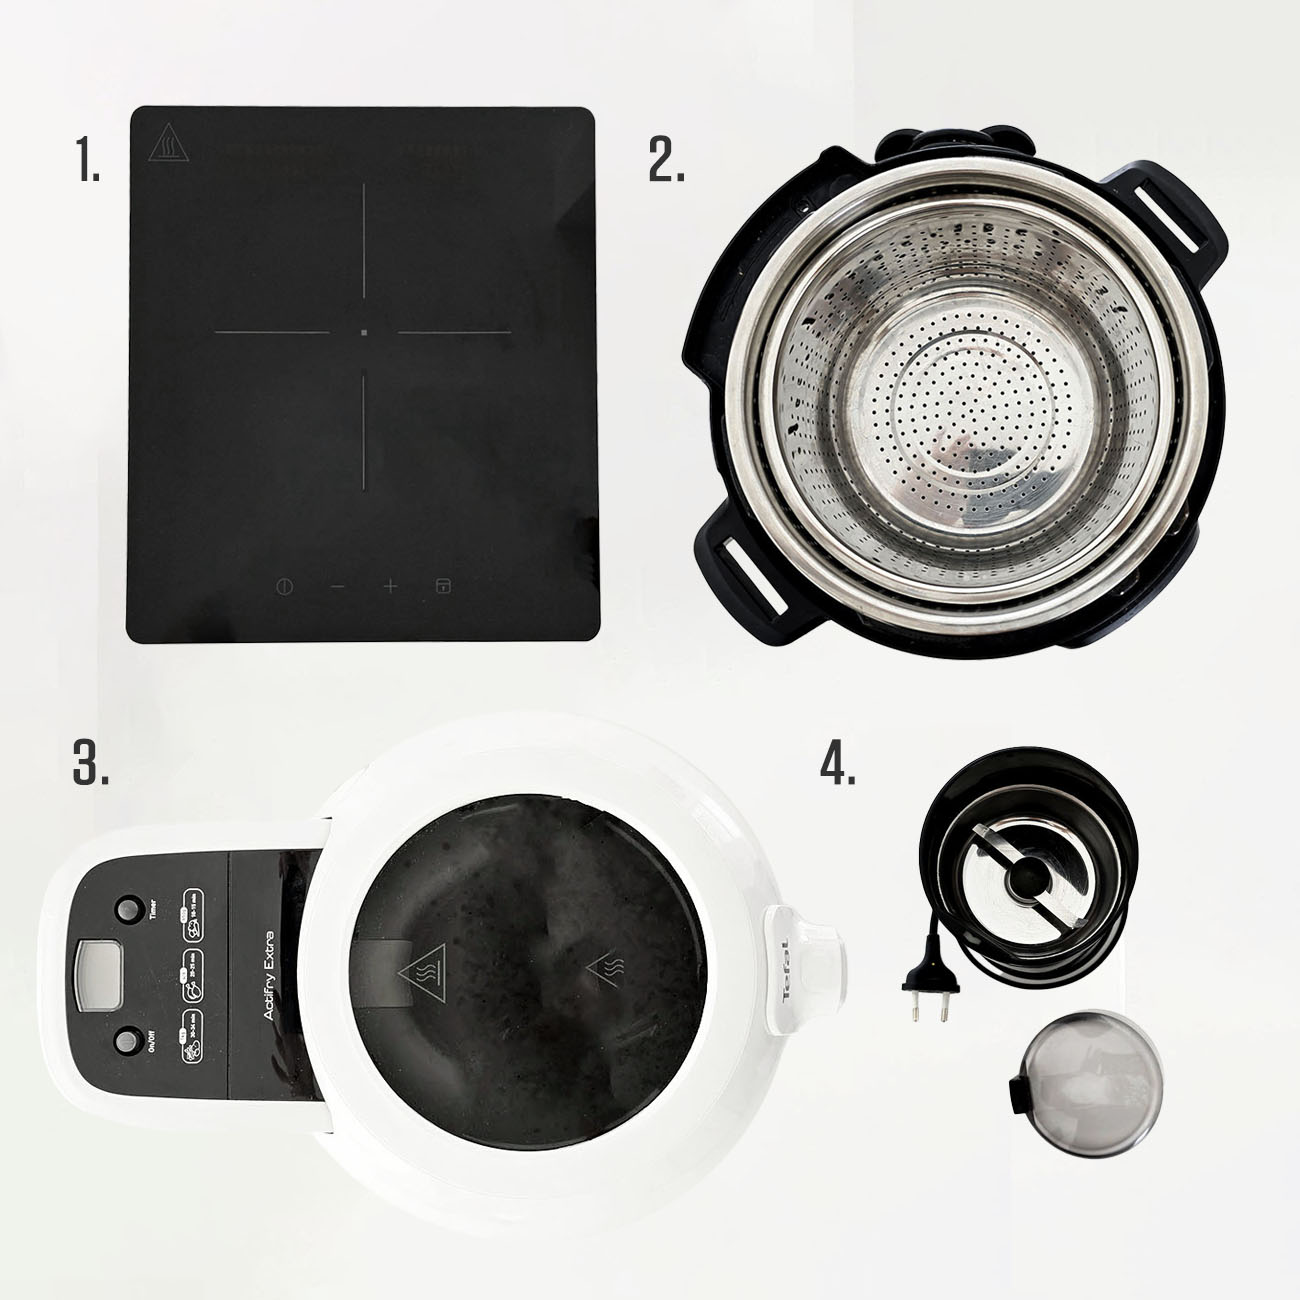
1. Induction Stove Top (from IKEA). We don’t have a full size stove top so we use a single induction stove that can be stored away. We use it for boiling and frying food. Ours is from IKEA.
2. Pressure Cooker (Instant Pot). A pressure cooker is not necessary to make recipes from this website but it does make your life a lot easier. We use it for all of our soups (it also keeps them warm!), for cooking beans and steaming vegetables. We have a steaming basket that we bought separately and we often use it to steam sweet potatoes.
3. Air Fryer (Tefal ActiFry). Another optional piece of equipment we use is an air-fryer with a paddle. It’s perfect for making tofu bites and mushrooms. In our experience, it’s the easiest method for cooking both that produces the best results.
4. Grinder (Bosch). Technically, it’s a coffee grinder but we don’t actually use it to grind coffee. It’s absolutely perfect for grinding spices and making nut-based parmesan. You can get one for about $15-20 and it’s worth its weight in gold if you like cheesy toppings. Ours is from Bosch, stainless steel 2-blade model.
Tools For Sauces & Dressings
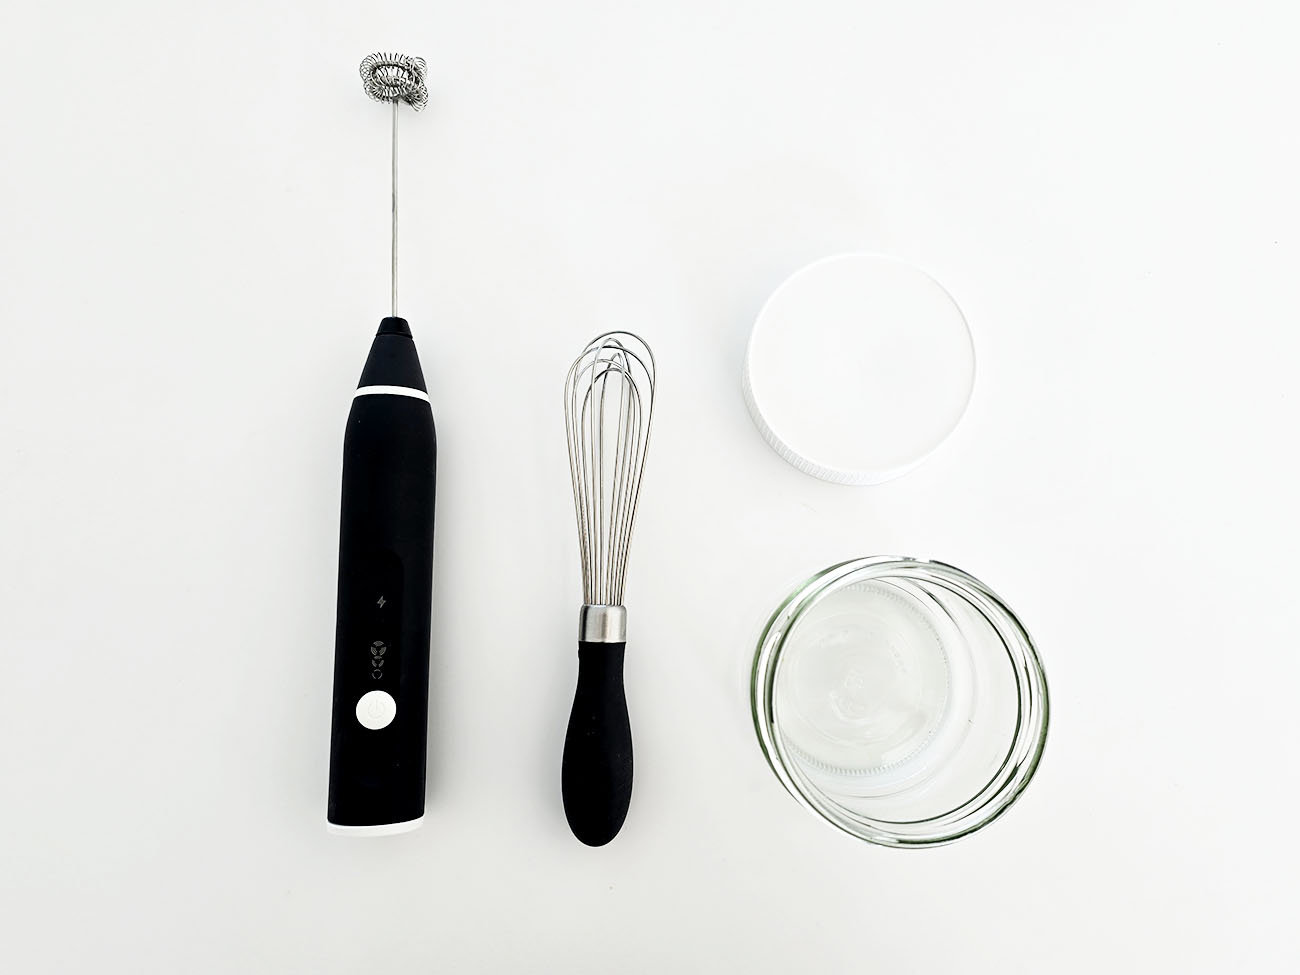
We make lots of sauces and dressings here at DAREBEETS and the best tool for making these is an electric mini milk frother or a mini whisk - we have and use both. You will also need a small jar with a lid. Add the ingredients to the jar and use the whisk or the frother to whisk everything together until smooth. If you have any sauce or dressing leftover just close the lid and store extras in the fridge. Once you are done, add a bit of dishwashing liquid and water to the jar, close the lid and shake. Rinse and you are done. It's easy to use, easy to clean and store and this method produces the best results.
Misc
We have several pot pads made from fabric and silicone, and a couple of silicone pads for handling hot oven trays. Kitchen gloves are great, but if speed is a priority for you, silicone pads are faster to grab.
A heavy-duty burger / grill press is very useful if you make pressed tofu and mushrooms on a regular basis. In our recipes we often advise you to press tofu or mushrooms while frying. You can always use the "lid and pot" technique or you can use a press like the one we have. Ours is from Weber and it's quite large - it fits a 28 cm ~ 11 inch pan perfectly. It's made completely from cast iron so it can go in the oven as well.
Always wash your greens, even if they come washed and pre-chopped. Scratch that, never buy pre-cut! Cut greens start breeding bacteria at an accelerated rate. Always buy your greens whole and do your own washing and chopping. A salad spinner is an invaluable tool to not just wash your greens and keep them safe for consumption, it can also be used for storage. We wash our greens, dry them using the spinner and then keep them inside the spinner in the fridge (top shelf). IKEA sells one but we prefer OXO Good Grips with a push-button (see below).
The moment you bring your greens home, add them to the spinner basket, generously drizzle with vinegar (any type) and cover with water. Let them soak for 10 minutes, drain and dry. This will a) rehydrate them b) kill all of the bacteria that grew on them so far. Greens will last much longer in your fridge this way.
- Silicone Pads (2) for hot pots and pans | Yamazaki
- Silicone Pads (2) for handling hot trays | IKEA
- Fabric Pads (4) for hot pots and pans | IKEA
- Grill Press | WEBER
- Salad Spinner | OXO Good Grips

Consumables
To make cooking, cleanup and food storage easier, we always have baking paper, cling film and food-grade disposable gloves on hand. We buy two rolls of baking paper so we are never out. Once one roll runs out, we buy another one. We often double-line our baking trays. It helps with any extra juices from soaking through during roasting and cuts down on tray cleaning. Anyone who ever cleaned an oven tray understands. Disposable gloves help with mixing, tossing and food transfer (primarily for hygiene reasons) especially if you are working with something oily. For example, use gloves when you need to evenly coat vegetables in oil before roasting.


